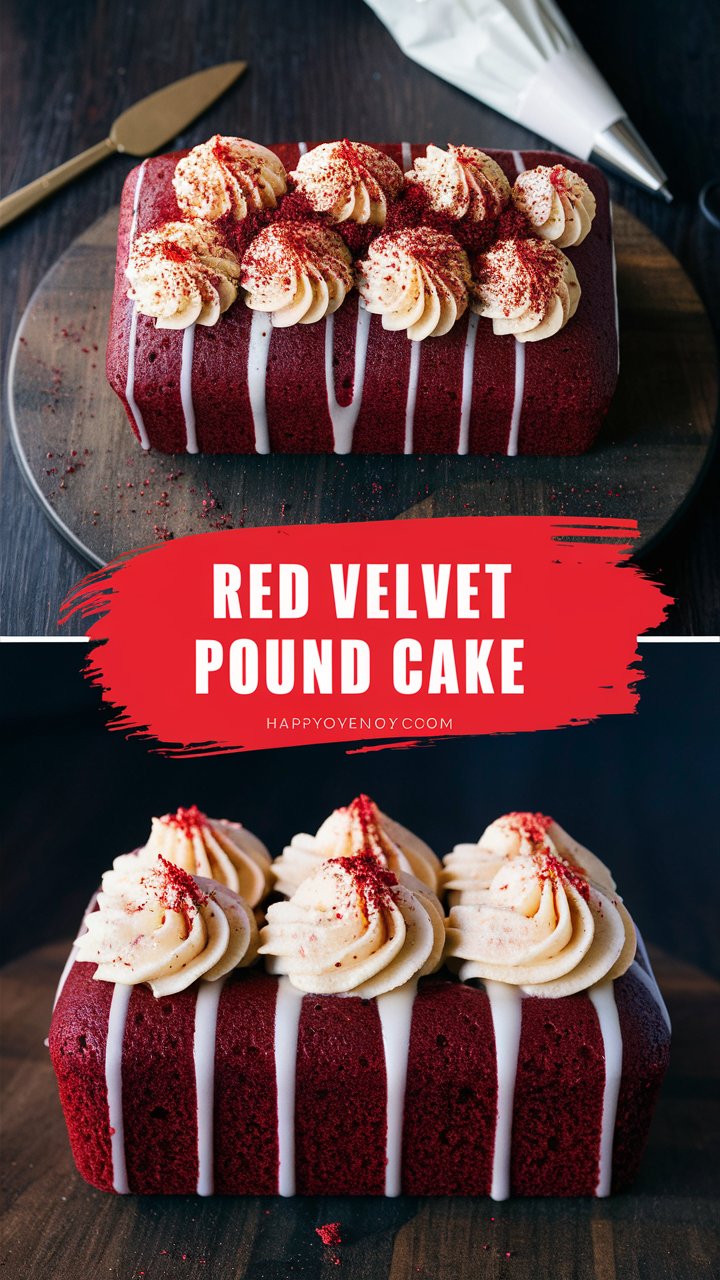
“The Best Moist Red Velvet Pound Cake Recipe You’ll Ever Try” 2025
Red velvet cake has long been cherished for its vibrant color, subtle cocoa flavor, and creamy frosting. Combining the dense, buttery richness of a classic pound cake with the festive appeal of red velvet creates a truly irresistible dessert. If you love moist, tender cakes with a silky smooth cream cheese frosting, this recipe is crafted just for you.
In this comprehensive guide, you will learn how to make a perfectly moist red velvet pound cake from scratch, discover expert baking tips, ingredient substitutions, storage advice, and serving suggestions. Whether you’re a beginner baker or a seasoned pro, this step-by-step walkthrough ensures success every time.
What Makes a Pound Cake Different? Understanding the Basics
Before diving into the recipe, let’s clarify what a pound cake is and how it differs from other cakes:
- Origins: Traditional pound cakes date back to 18th-century Europe and were named because they originally contained one pound each of butter, sugar, eggs, and flour.
- Texture: Pound cakes have a dense yet tender crumb, rich butter flavor, and a moist finish. This is achieved through careful ingredient balance and mixing technique.
- Why Pound Cake for Red Velvet? Using the pound cake method for red velvet results in a cake that holds its shape beautifully, slices cleanly, and offers a slightly more substantial texture than a typical layered red velvet cake.
Key Ingredients and Their Roles in This Recipe
Each ingredient in this recipe contributes to the final texture, flavor, and appearance of the red velvet pound cake.
Butter (Room Temperature Unsalted)
- Provides richness, flavor, and moisture.
- Creaming butter with sugar incorporates air, giving the cake a light crumb.
- Unsalted butter allows control over salt levels.
Granulated Sugar
- Sweetens the cake.
- Aids in creaming with butter to build cake structure.
Eggs
- Bind ingredients and add moisture.
- Provide leavening when whipped into batter.
- Use fresh, room temperature eggs for best emulsion.
Vegetable Oil
- Adds extra moisture and keeps the cake tender.
- Use flavorless oils like canola, grapeseed, or avocado oil for a neutral taste.
Buttermilk
- Adds tang and moisture.
- Reacts with baking soda for lift and tender crumb.
- DIY alternative: mix 1 cup milk with 1 tbsp lemon juice or vinegar and let sit 5 minutes.
Vinegar
- Reacts with baking soda to leaven the cake.
- Enhances the bright red color by stabilizing the food coloring.
Vanilla Extract
- Adds subtle warmth and depth.
Red Food Coloring
- Signature red velvet color.
- Prefer gel food coloring for vibrant hue without adding too much liquid.
Cake Flour
- Has lower protein than all-purpose flour, producing a tender crumb.
- If unavailable, a homemade substitute with all-purpose flour and cornstarch can work.
Cocoa Powder (Unsweetened)
- Adds subtle chocolate flavor without overwhelming sweetness.
- Dutch-process cocoa can be used but may darken batter and affect coloring.
Baking Powder & Baking Soda
- Leavening agents to ensure rise and texture.
Equipment Needed
- 11×4 inch or 9×5 inch loaf pan (or adjust recipe accordingly)
- Electric mixer or stand mixer
- Mixing bowls
- Measuring cups and spoons (preferably a kitchen scale)
- Sifter for dry ingredients
- Toothpick or cake tester
- Cooling rack
Step-by-Step Instructions for the Moist Red Velvet Pound Cake
Preparing Your Pan and Oven
- Preheat oven to 330°F (165°C).
- Grease your loaf pan thoroughly and optionally line with parchment paper for easy removal.
Mixing the Batter
- Cream Butter and Sugar: In a large bowl, beat the room-temperature butter and granulated sugar on medium-high speed until light and fluffy—about 2-3 minutes. This step is crucial for a light texture.
- Add Eggs: Add eggs one at a time, mixing on low speed after each addition until incorporated. Avoid overmixing here to prevent tough cake.
- Combine Liquids: In a separate bowl, mix buttermilk, vegetable oil, vinegar, vanilla extract, and red food coloring.
- Add Liquid Ingredients: Gradually add half the liquid mixture to the butter-sugar-egg mixture and blend on low speed.
- Add Dry Ingredients: Sift together cake flour, cocoa powder, baking powder, and baking soda. Add half the dry ingredients to the batter and mix at the lowest speed.
- Repeat: Alternate adding the remaining liquids and dry ingredients, mixing gently after each addition.
Baking the Cake
- Pour the batter evenly into the prepared pan.
- Bake for approximately 45 minutes or until a toothpick inserted into the center comes out clean.
- Remove from oven and cool in the pan for 15 minutes.
- Transfer to a wire rack to cool completely before frosting.
Making the Perfect Cream Cheese Frosting
Ingredients
- Unsalted butter, room temperature
- Icing (powdered) sugar, sifted
- Full-fat cream cheese, room temperature
- Vanilla extract
Method
- Beat the butter until light in color (about 1 minute).
- Add icing sugar in two batches, mixing on high speed for 5 minutes to create a smooth texture.
- Add cream cheese and vanilla extract; beat on medium speed until combined and fluffy.
- Chill slightly if too soft before frosting.
Tips and Tricks for Baking Success
- Use a kitchen scale: Accurate measurement ensures consistent results.
- Room temperature ingredients: Butter, eggs, and cream cheese should be at room temperature for smooth mixing.
- Don’t overmix after adding eggs: Overmixing can cause a dense, tough cake.
- Preheat your oven: Proper temperature affects rise and texture.
- Test doneness with a toothpick: Insert into center; if it comes out clean or with a few moist crumbs, the cake is done.
- Let cake cool fully: Frosting a warm cake causes it to melt.
Ingredient Substitutions and Variations
- Egg substitutes: For vegan or egg-free options, try commercial egg replacers or flax eggs.
- Buttermilk substitute: Milk + lemon juice or vinegar works well.
- Oil alternatives: Use any neutral-tasting oil such as avocado or light olive oil.
- Coloring: Use powdered food coloring if gel is unavailable; adjust quantity carefully.
- Flour: All-purpose flour with cornstarch can replace cake flour but may affect tenderness.
- Add-ins: Consider folding in white chocolate chips or chopped nuts for texture.
How to Store and Freeze Your Red Velvet Pound Cake
- Room temperature: Keep cake in an airtight container for up to 3 days.
- Refrigeration: Store frosted or unfrosted cake covered for up to 1 week.
- Freezing: Wrap cake tightly with plastic wrap and foil, freeze for up to 1 month. Thaw overnight in the fridge before serving.
Serving Suggestions and Pairings
- Serve slices with a dollop of whipped cream or fresh berries for contrast.
- A cup of coffee or milk pairs perfectly with the richness of the cake.
- Try layering slices with additional cream cheese frosting and fresh strawberries for a quick trifle.
Frequently Asked Questions (FAQs)
Why is my red velvet cake not red enough?
- Using poor-quality or insufficient food coloring affects the color. Gel colors give the best vibrancy.
Why does my cake turn out dry?
- Overbaking or not using enough oil/butter can dry out the cake. Use a timer and test early.
Can I make this recipe dairy-free?
- Substitute dairy ingredients with plant-based milk, vegan butter, and cream cheese alternatives.
Conclusion: Baking Your Best Red Velvet Pound Cake Ever
With this ultimate guide, you have everything you need to bake a moist, tender, and visually stunning red velvet pound cake. From ingredient selection to baking tips and frosting secrets, each step is crafted to help you succeed with confidence. Whether for a special occasion or an everyday treat, this cake is sure to impress family and friends alike.
Now it’s your turn to bake, frost, and enjoy a slice of this classic Southern favorite with a rich twist. Happy baking!