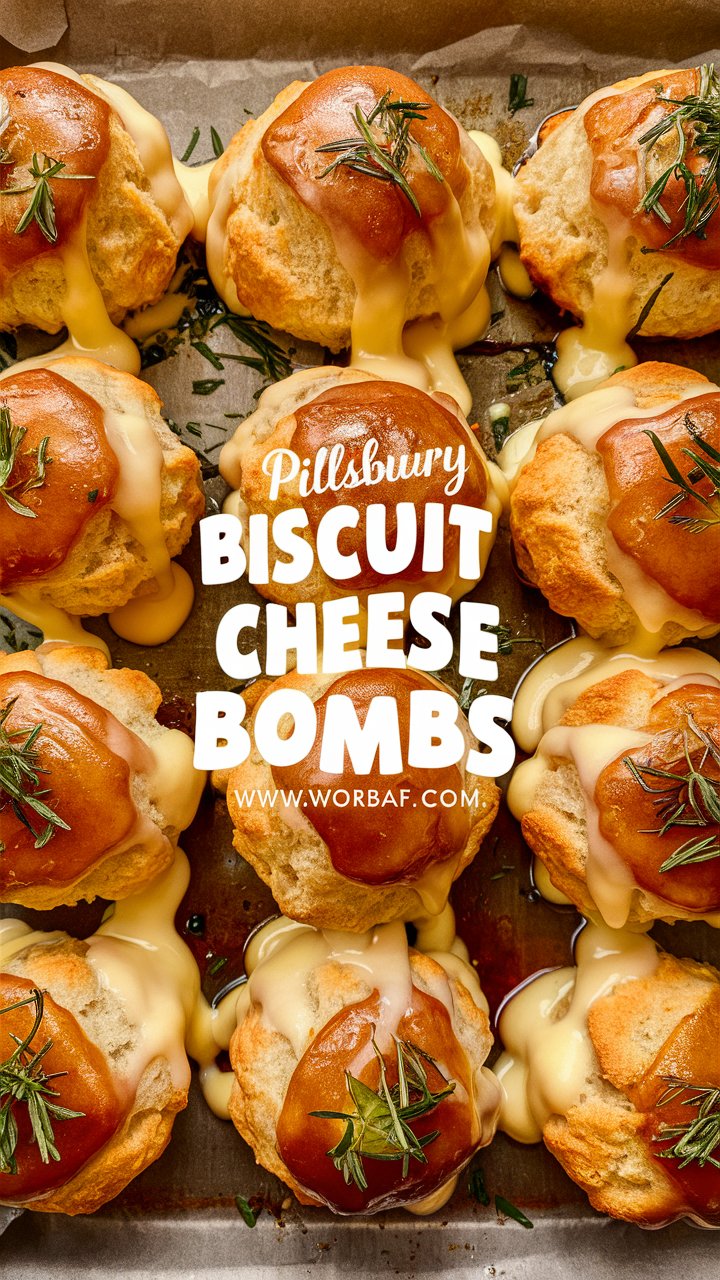
Step-by-Step Guide to Perfect Pillsbury Biscuit Garlic Butter Cheese Bombs 2025
When it comes to quick comfort food that excites your taste buds, Pillsbury Biscuit Garlic Butter Cheese Bombs are an unbeatable choice. These golden, buttery, cheese-stuffed delights combine the convenience of store-bought biscuits with rich garlic butter and gooey cheese for an indulgent treat that’s perfect for any occasion. Whether you’re hosting a party, preparing a quick snack, or looking for a tasty side dish, this recipe offers simplicity and flavor in every bite.
In this ultimate guide, we will cover everything you need to master these cheese bombs—from ingredient selection and step-by-step instructions to expert tips, variations, and frequently asked questions. Plus, you’ll discover how to customize this recipe for your dietary preferences, store leftovers without losing texture, and serve them alongside delicious dips and meals.
Why Pillsbury Biscuit Garlic Butter Cheese Bombs?
Pillsbury Grands! biscuits provide the perfect dough base: flaky yet soft, slightly buttery, and quick to bake. Stuffing them with cheese adds creamy richness, while brushing with garlic butter takes these snacks from simple to spectacular. The magic lies in the harmony of these elements baked to golden perfection. Plus, the recipe requires minimal prep time, no special baking skills, and easily customizable flavors.
Ingredients for the Perfect Cheese Bombs
Before starting, ensure you have the following fresh and quality ingredients:
- 1 can (8-count) Pillsbury Grands! Biscuits: The larger size works best for stuffing and yielding fluffy cheese bombs.
- 1 ½ cups shredded mozzarella cheese: Mozzarella melts beautifully, offering that irresistible stretch. You can substitute or mix with cheddar, pepper jack, or provolone for different flavors.
- 4 tablespoons unsalted butter: Butter is key for brushing and infusing the biscuits with savory richness.
- 3 garlic cloves, finely minced: Fresh garlic gives the best aroma and flavor punch.
- 2 tablespoons fresh parsley, finely chopped: Adds a pop of color and herbaceous freshness. Dried parsley can work as a substitute.
- ½ teaspoon garlic powder: Enhances garlic flavor evenly.
- ¼ teaspoon salt: Balances flavors without overpowering.
- Optional: grated Parmesan cheese: For sprinkling on top to add a savory, nutty crust.
Step-by-Step Instructions to Make Pillsbury Biscuit Garlic Butter Cheese Bombs
Step 1: Preheat and Prepare the Baking Dish
Set your oven to 375°F (190°C). Lightly grease a cast iron skillet, baking dish, or parchment-lined baking sheet with butter or nonstick spray. This ensures the biscuits bake evenly and develop a golden crust.
Step 2: Flatten the Biscuits
Carefully open the biscuit can and separate the dough pieces. Flatten each biscuit gently with your hands or a rolling pin until about ½ inch thick. Flattening creates enough space to fill with cheese without tearing the dough.
Step 3: Add the Cheese Filling
Place a generous tablespoon or small cube of shredded cheese in the center of each flattened biscuit. Feel free to mix cheeses for a complex flavor or add small bits of cooked bacon or jalapeños for extra punch.
Step 4: Seal and Shape
Fold the biscuit edges over the cheese carefully, pinching the dough tightly to seal the cheese inside. Roll the sealed biscuit gently into a ball shape, making sure no gaps remain where cheese can leak during baking.
Step 5: Arrange in the Pan
Place the cheese bombs seam-side down in your prepared baking dish or skillet. Position them close enough to touch slightly but with enough room for them to puff up while baking.
Step 6: Make the Garlic Butter
In a small saucepan or microwave-safe bowl, melt the butter over low heat. Stir in minced garlic, garlic powder, salt, and chopped parsley. Warm gently for 1–2 minutes, just until the garlic releases its aroma—avoid browning.
Step 7: Brush the Cheese Bombs
Brush the garlic butter mixture generously over the tops of the biscuits. This coating will help the bombs brown and add irresistible flavor.
Step 8: Bake to Golden Perfection
Place the pan in the oven and bake for 15–18 minutes, until the biscuits are puffed and golden brown on top.
Step 9: Final Garlic Butter Brush and Optional Parmesan
Once baked, remove the bombs from the oven and immediately brush with any remaining garlic butter. If desired, sprinkle grated Parmesan over the tops for a savory finish.
Step 10: Serve Warm and Enjoy!
Let the cheese bombs cool for a few minutes but serve them warm to enjoy the gooey cheese and buttery garlic flavors.
Pro Tips for Perfect Cheese Bombs Every Time
- Seal dough edges tightly: Prevent cheese leakage by pressing dough edges firmly.
- Use fresh garlic for best aroma: Fresh minced garlic outperforms powders for flavor intensity.
- Don’t overcrowd the pan: Leave enough space for biscuits to expand without merging.
- Experiment with cheese blends: Mixing mozzarella with cheddar or pepper jack adds complexity.
- Add heat: For a spicy kick, add red pepper flakes to garlic butter or jalapeño cheese inside.
- For extra crispiness: Bake in a cast-iron skillet or on a perforated baking tray.
Variations and Customizations
- Cheese options: Try cheddar, pepper jack, gouda, provolone, or cream cheese fillings.
- Herbs and spices: Mix in Italian seasoning, rosemary, thyme, or smoked paprika for new flavor profiles.
- Add-ins: Small cooked bacon pieces, caramelized onions, or sautéed mushrooms can be folded in with the cheese.
- Healthier swaps: Use reduced-fat cheese and whole wheat biscuit dough if available.
- Vegan version: Use dairy-free biscuit dough and plant-based cheese alternatives; garlic butter can be replaced with olive oil mixed with garlic.
Serving Suggestions and Pairings
These cheese bombs shine as appetizers, snacks, or sides. Serve with:
- Marinara sauce or spicy arrabbiata for dipping
- Ranch dressing or blue cheese dip
- A fresh green salad or Caesar salad for balance
- Soups like tomato basil or creamy potato leek
- Charcuterie boards with cured meats and olives
Storage and Reheating Tips
- Refrigerate: Store leftovers in an airtight container for up to 3 days. Reheat in the oven at 350°F for 5–8 minutes to restore crispness.
- Freeze: Once cooled, freeze in a sealed bag for up to 3 months. Reheat from frozen in the oven at 350°F for 10–12 minutes.
- Avoid microwave reheating if possible, as it softens the crispy texture.
Nutrition Overview (Per Cheese Bomb)
Approximate values depend on cheese type and size:
- Calories: 210-250 kcal
- Total Fat: 12g
- Saturated Fat: 6g
- Protein: 7g
- Carbohydrates: 18g
- Sodium: 430mg
Enjoy as an occasional indulgence or party treat.
Frequently Asked Questions
1. Can I prepare these in advance?
Yes! Assemble the cheese bombs and refrigerate covered for up to 24 hours before baking. This is great for meal prepping or party planning.
2. What if I don’t have Pillsbury biscuits?
Crescent roll dough or homemade biscuit dough can be used, but Pillsbury Grands! are recommended for their size and texture.
3. How can I make these dairy-free?
Use vegan biscuit dough and plant-based cheese. Brush with olive oil and garlic instead of butter.
4. Can I bake these in an air fryer?
Yes! Bake at 350°F for 8–10 minutes, checking for a golden top and melted cheese inside.
5. Why is my cheese leaking out?
Make sure to pinch the dough edges firmly and bake seam-side down to minimize leaks.
The History and Popularity of Cheese Bombs
Cheese bombs are a recent comfort food trend blending traditional biscuit recipes with gooey cheese fillings. They have gained popularity on social media for their visual appeal (the stretchy cheese) and easy party-ready nature. Using store-bought dough elevates convenience without sacrificing flavor, making them a go-to for busy cooks and snack lovers alike.
Conclusion
Pillsbury Biscuit Garlic Butter Cheese Bombs are a delightful, simple way to satisfy cheese cravings while impressing guests or family with minimal effort. This recipe’s balance of buttery, garlicky biscuits and melted cheese offers irresistible comfort food that’s quick to prepare and endlessly customizable.
Try the tips and variations shared in this guide to make this classic appetizer your own signature dish. Whether for game day, a movie night, or holiday party, these cheese bombs promise smiles, satisfied appetites, and a happy kitchen.