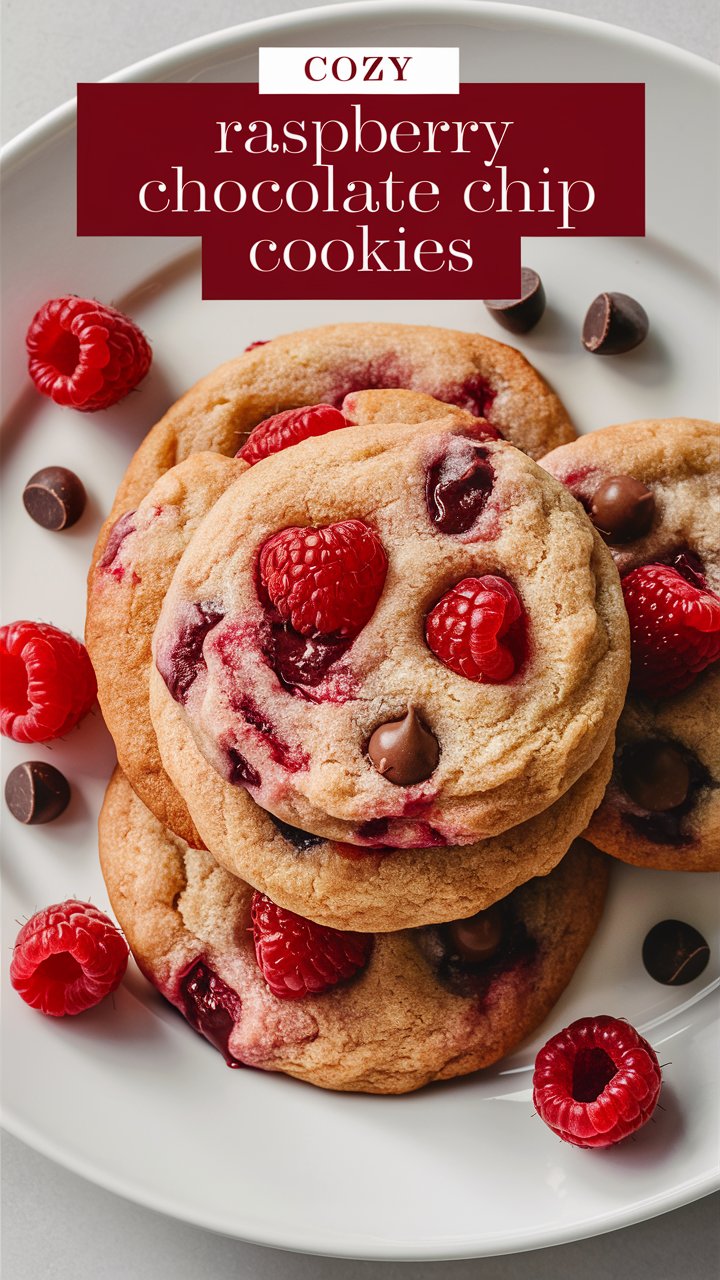
Soft & Chewy Raspberry Cookies Recipe: A Bakery-Style Treat for Every Occasion 2025
Cookies have always held a place in our hearts—simple, sweet, and endlessly adaptable. But among the classic chocolate chip and oatmeal raisin, there’s a hidden gem that deserves the spotlight: raspberry cookies.
These cookies aren’t just baked goods—they’re a moment of joy wrapped in a golden, chewy exterior, with pops of tangy-sweet raspberry woven through each bite. Whether you’re searching for a unique dessert to wow guests or a new comfort snack for cozy evenings, raspberry cookies are your next baking obsession.
In this guide, we’re going beyond the basic recipe. You’ll learn how to master the texture, balance the tart and sweet flavors, troubleshoot common baking issues, and elevate your cookies to gourmet status. Let’s bake better, smarter, and more joyfully—with a recipe that’s as wholesome and inviting as it is foolproof.
Why Raspberry Cookies?
If you’ve ever craved a cookie that’s not overwhelmingly sweet yet still indulgent, raspberry cookies are your answer. Here’s why they’re a favorite:
- Perfect Flavor Balance: The buttery dough softens the natural tartness of raspberries for a rounded, refined flavor.
- Seasonal & Versatile: You can use fresh berries in summer or frozen ones year-round.
- Elegant Yet Easy: These cookies look bakery-made but come together in just a few simple steps.
- Kid-Friendly & Crowd-Pleasing: Sweet enough for children, elevated enough for adults.
Ingredients Overview: What You’ll Need
Let’s break down each component of this recipe so you understand not just the “what,” but also the “why.”
1. Butter (1 cup / 226g)
Butter gives these cookies their classic rich flavor and chewy-soft texture. Use unsalted butter to control the salt level in your recipe. Let it soften at room temperature for optimal creaming.
2. Granulated Sugar (1 cup / 200g)
White sugar contributes to the cookie’s structure and sweetness, giving you that perfect golden edge.
3. Light Brown Sugar (½ cup / 110g)
Brown sugar enhances moisture and adds a subtle caramel depth, which complements the tart raspberries beautifully.
4. Eggs (2 large)
Eggs bind the dough and add structure, helping the cookies hold their shape while staying tender.
5. Vanilla Extract (2 tsp)
Use pure vanilla extract for a warm, aromatic background that enhances both the dough and the berries.
6. All-Purpose Flour (2¾ cups / 345g)
Provides the body of the cookies. Sifted flour ensures a soft texture and even distribution of leavening agents.
7. Baking Soda (½ tsp)
Allows the cookies to spread slightly and gives a chewy bite.
8. Salt (½ tsp)
Balances the sweetness and intensifies the flavor of all ingredients.
9. Fresh or Frozen Raspberries (1 cup)
The star ingredient. Fresh berries add brightness and natural juiciness. If using frozen, don’t thaw—they’ll retain structure better.
10. Optional: Extra Sugar for Rolling
Rolling dough balls in sugar creates a crisp outer layer and an attractive finish.
Step-by-Step Instructions: Mastering the Perfect Raspberry Cookie
Step 1: Cream the Butter and Sugars
In a large mixing bowl, beat the butter, granulated sugar, and brown sugar together until light and fluffy—about 2–3 minutes. This step is crucial. It incorporates air and ensures a chewy texture with soft centers.
Pro Tip: Scrape down the bowl halfway through mixing to ensure even creaming.
Step 2: Add Eggs and Vanilla
Add eggs one at a time, mixing well after each. Stir in vanilla extract until the mixture is smooth and glossy. Your batter should look pale, creamy, and silky.
Step 3: Combine Dry Ingredients
In a separate bowl, whisk together flour, baking soda, and salt. Gradually add the dry ingredients to the wet mix. Stir just until the dough forms—don’t overmix.
Overmixing Alert: Overworked dough develops gluten, leading to tough cookies.
Step 4: Gently Fold in Raspberries
Using a silicone spatula, gently fold in raspberries. Avoid smashing them; it’s okay if some juice marbles the dough. For frozen berries, work quickly to prevent excess moisture release.
Step 5: Scoop & Shape
Use a cookie scoop or rounded tablespoon to portion dough into balls. Optional: roll each in granulated sugar for a sweet, crisp shell.
Place on a parchment-lined baking sheet, spacing them 2 inches apart.
Step 6: Bake
Bake at 350°F (175°C) for 10–13 minutes, depending on cookie size and your oven. Edges should be golden, and centers just set.
Baking Tip: Slightly underbake for softer cookies—the residual heat will finish the job as they cool.
Step 7: Cool & Serve
Let cookies cool on the baking sheet for 5 minutes before transferring to a wire rack. Enjoy warm, or store as instructed below.
Storage Tips for Maximum Freshness
- Room Temperature: Store in an airtight container for up to 3 days.
- Refrigerator: Keep for up to 1 week, letting them come to room temperature before serving.
- Freezer: Freeze baked cookies with parchment paper between layers in a zip-lock bag or container for up to 3 months.
Common Questions (FAQs)
1. Can I use other berries?
Yes! Blueberries and chopped strawberries work well, but adjust for moisture content—especially with juicy fruits like strawberries.
2. How can I prevent the raspberries from breaking?
Fold them in gently and keep them cold (freeze fresh berries for 15 minutes if needed).
3. Can I chill the dough overnight?
Absolutely. Chilling enhances flavor and prevents excessive spreading. Let it rest for at least 30 minutes, or overnight for best results.
4. Are these cookies overly sweet?
No. The berries bring natural tartness that balances the sugar content. For less sweetness, reduce granulated sugar by 2 tablespoons.
5. Can I add extras like chocolate chips or nuts?
Yes! Try:
- ¾ cup white chocolate chips
- ½ cup chopped macadamia or almonds
- A lemon glaze drizzle for brightness
Texture Tips: How to Achieve the Perfect Bite
Achieving that bakery-perfect cookie means understanding the science behind texture:
| Desired Texture | What to Do |
|---|---|
| Soft and Chewy | Use more brown sugar than white, don’t overbake |
| Crispy Edges | Use granulated sugar and roll dough in extra sugar |
| Thick Cookies | Chill the dough and reduce baking soda slightly |
| Gooey Centers | Underdone by 1–2 mins + rest on hot sheet after bake |
Creative Flavor Twists
Add a unique spin on your classic raspberry cookies with these variations:
1. Raspberry Lemon Cookies
Add 1 tsp lemon zest and 1 tbsp lemon juice to the dough.
2. Raspberry Cream Cheese Swirl
Dollop softened cream cheese (mixed with powdered sugar) into cookie centers before baking.
3. Raspberry Almond Cookies
Replace vanilla with almond extract and add sliced almonds on top.
4. Raspberry Oat Cookies
Substitute ¾ cup of flour with rolled oats for a heartier bite.
Serving Ideas
- Tea Time Delight: Serve with Earl Grey or chamomile tea.
- Dessert Platter: Pair with mini cheesecakes and macarons.
- Holiday Gifting: Stack in clear jars with ribbon—these cookies are festive and freeze well.
- Brunch Addition: Serve as a sweet bite alongside fruit salad and yogurt parfaits.
Raspberry Cookie Recipe Summary
Prep Time: 15 minutes
Cook Time: 10–13 minutes
Total Time: 30 minutes
Yield: 24 cookies
Category: Dessert
Difficulty: Easy
Suitable For: Kids, parties, brunch, gifting, snack
Estimated Nutrition (Per Cookie)
(May vary depending on ingredients used and cookie size)
- Calories: 190
- Total Fat: 9g
- Saturated Fat: 5g
- Cholesterol: 35mg
- Sodium: 90mg
- Carbohydrates: 26g
- Sugar: 14g
- Protein: 2g
- Fiber: 1g
Final Thoughts: Why This Recipe Works Every Time
These raspberry cookies are more than a quick dessert—they’re a celebration of contrasts: tart and sweet, soft and crisp, rustic and elegant. They bake beautifully, store well, and elevate any occasion with their simple charm and sophisticated flavor.
Whether you’re baking for yourself, your family, or your next gathering, this is a cookie that always impresses. And with all the science-backed tips and variations shared here, you’re fully equipped to own this recipe like a pro.