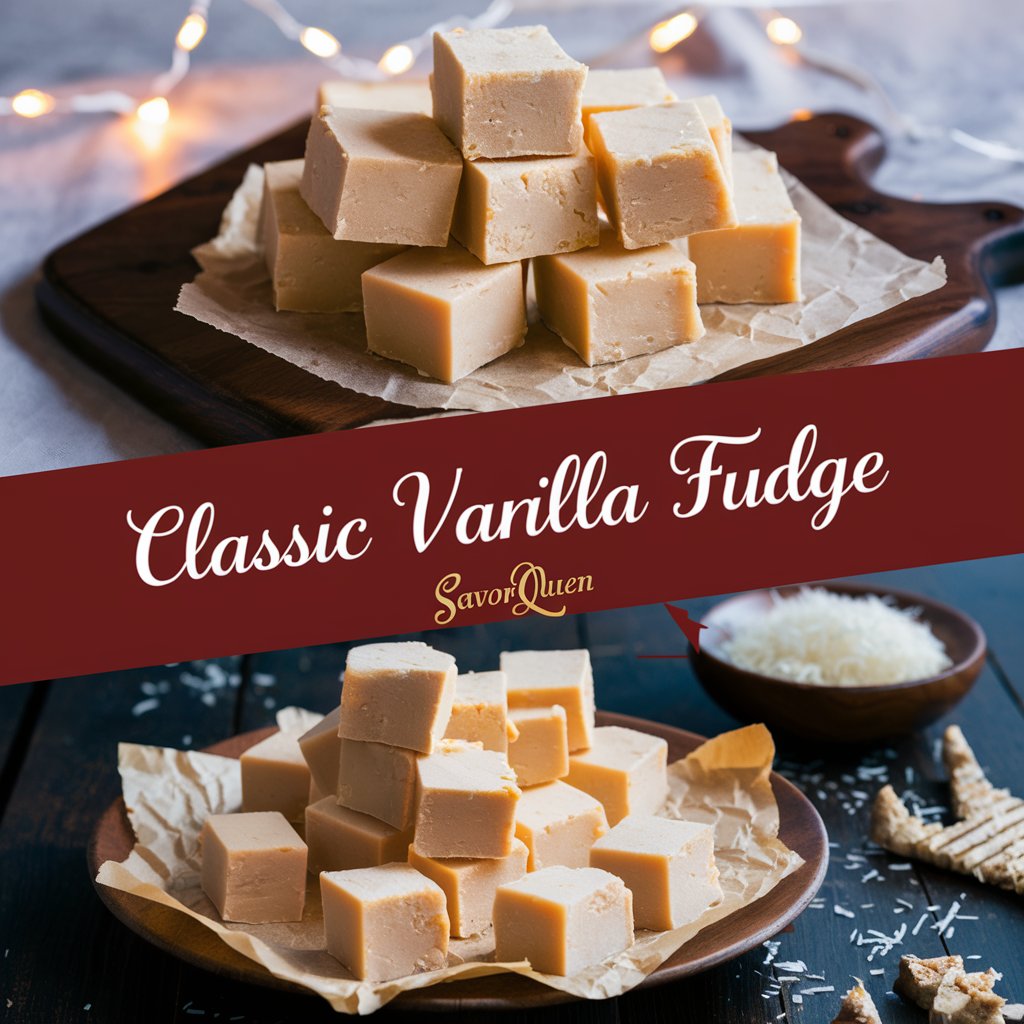
Old-Fashioned Vanilla Fudge That Tastes Like Childhood2025
There’s something inherently heartwarming about the scent of vanilla mingling with butter and sugar in a cozy kitchen. That familiar fragrance alone can transport you to a simpler time—grandma’s house during the holidays, a cheerful bake sale, or the comforting silence of a late-night snack. Among the timeless treats that have stood the test of generations, Classic Vanilla Fudge earns its place as a beloved staple.
Smooth, creamy, rich, and beautifully simple, vanilla fudge is a confection that brings pure joy. Despite its luxurious texture and flavor, it doesn’t require fancy ingredients or professional culinary skills—just a bit of patience and a love for sweetness.
This article is your ultimate guide to Classic Vanilla Fudge. Whether you’re a beginner cook or an experienced baker, you’ll find tips, techniques, and creative twists that elevate this nostalgic favorite into a show-stopping delight.
Table of Contents
- What Makes Vanilla Fudge “Classic”?
- Ingredients & Their Roles
- Step-by-Step Guide to Making Classic Vanilla Fudge
- Pro Tips for Perfect Texture
- Common Mistakes and How to Fix Them
- Flavor Variations to Try
- Presentation, Packaging & Gifting Ideas
- Serving Suggestions
- Storage Guide (Room Temp, Fridge, and Freezer)
- Nutrition Information
- Frequently Asked Questions
- Final Thoughts
1. What Makes Vanilla Fudge “Classic”?
Vanilla fudge stands out because it showcases the beauty of simplicity. Unlike its chocolate or nut-heavy cousins, vanilla fudge keeps the spotlight on its smooth texture and the subtle elegance of vanilla. The creamy ivory squares have a delicate yet rich flavor, offering melt-in-your-mouth satisfaction with each bite.
Its minimalism is its strength—no overwhelming elements, just sugar, butter, milk, vanilla, and powdered sugar coming together in sweet harmony.
2. Ingredients & Their Roles
To make the perfect batch of vanilla fudge, every ingredient must serve a clear purpose. Let’s break down what goes into this classic confection:
🔹 Granulated Sugar (2 cups)
The base of any fudge, sugar provides structure and sweetness. It also undergoes a caramelization-like process during boiling, giving fudge its body.
🔹 Unsalted Butter (½ cup)
Butter adds a silky mouthfeel and rich flavor. Use unsalted to control the salt level better.
🔹 Whole Milk (½ cup)
Milk is the primary liquid in fudge. Its fat and water content help create a smooth texture when combined with sugar and butter.
🔹 Pure Vanilla Extract (1 tsp)
Vanilla isn’t just a flavor—it’s the heart of the fudge. Pure extract delivers warmth and depth unmatched by imitation versions.
🔹 Powdered Sugar (2 cups, sifted)
This soft sugar thickens and gives fudge its signature smoothness without making it gritty. Sifting helps prevent lumps.
🔹 Salt (Pinch)
A small pinch balances the sweetness and brings out the complexity of the vanilla.
3. Step-by-Step Guide to Making Classic Vanilla Fudge
Here is a straightforward method that ensures a creamy, smooth finish every time.
🔸 Step 1: Prepare the Pan
- Line an 8×8-inch square baking dish with parchment paper.
- Leave extra overhang on the sides for easy lifting.
- Lightly grease the paper with butter or spray.
🔸 Step 2: Combine Base Ingredients
- In a medium saucepan, combine granulated sugar, butter, milk, and salt.
- Place over medium heat, stirring constantly until the mixture comes to a boil.
🔸 Step 3: Boil and Time It
- Once boiling, continue to stir and allow the mixture to bubble gently for 5 minutes.
- Stir constantly to prevent scorching.
🔸 Step 4: Remove from Heat and Add Vanilla
- After 5 minutes, remove from heat and immediately stir in the vanilla extract.
- The aroma will intensify and fill your kitchen with warmth.
🔸 Step 5: Beat in Powdered Sugar
- Slowly sift and add the powdered sugar.
- Use an electric mixer or strong whisk to beat the mixture until thick, smooth, and slightly glossy.
🔸 Step 6: Pour and Set
- Pour the mixture into your prepared pan and spread evenly.
- Tap lightly on the counter to remove air bubbles.
- Let sit at room temperature for 2–3 hours until firm.
🔸 Step 7: Cut and Serve
- Once set, lift the fudge using the parchment paper.
- Cut into even squares with a sharp knife.
- Enjoy or store as instructed below.
4. Pro Tips for Perfect Texture
To get that silky, creamy bite every time, keep these tips in mind:
- Use a candy thermometer (optional): If you want more control, aim for 234°F (112°C) at boiling.
- Don’t overbeat: Once the fudge thickens and loses its gloss slightly, stop beating.
- Use room temperature ingredients: Cold butter or milk may slow the mixing process or change texture.
- Sift powdered sugar: To avoid lumps, never skip this step.
5. Common Mistakes and How to Fix Them
❌ My fudge didn’t set properly.
Fix: Reheat the mixture, beat again, and let it set for longer. Make sure the boiling time was accurate.
❌ It’s grainy instead of smooth.
Fix: Graininess comes from undissolved sugar crystals. Ensure sugar is fully melted before boiling and never stir once the mixture begins to cool.
❌ It’s too soft or sticky.
Fix: This usually results from undercooking or humid storage. Let it set in the fridge and store in a sealed container.
6. Flavor Variations to Try
While vanilla is the classic, you can easily elevate this recipe with delicious twists:
| Flavor | Additions |
|---|---|
| Vanilla Bean | Add scraped vanilla bean or paste for specks and a stronger flavor. |
| White Chocolate Swirl | Mix in ½ cup of melted white chocolate. |
| Nutty Vanilla Fudge | Fold in chopped walnuts, pecans, or almonds before setting. |
| Salted Vanilla Fudge | Sprinkle flaky sea salt over the top. |
| Almond or Coconut Extract | Replace half the vanilla with other natural extracts. |
| Festive Colors | Add a drop of food coloring for themed fudge (e.g., red & green for Christmas). |
7. Presentation, Packaging & Gifting Ideas
Vanilla fudge isn’t just a dessert—it’s a perfect gift idea for holidays, birthdays, and celebrations.
🎁 Packaging Tips:
- Use wax paper or parchment between layers to prevent sticking.
- Wrap individual squares in colored foil or mini cupcake liners.
- Place in a decorative tin or mason jar with a handwritten label.
🎉 Gifting Occasions:
- Holiday baskets
- Wedding or baby showers
- Teacher or neighbor gifts
- Corporate gifts
- Valentine’s Day treat bags
8. Serving Suggestions
Vanilla fudge is delightful on its own, but here are a few fun ways to serve it:
- With coffee or tea for an elegant dessert.
- As a topping on ice cream or brownies.
- With fruit and nuts on a dessert charcuterie board.
- In hot cocoa bombs as a surprise center.
9. Storage Guide (Room Temp, Fridge, Freezer)
Proper storage keeps fudge fresh and flavorful.
Room Temperature
- Store in an airtight container.
- Keep in a cool, dry place for up to 1 week.
Refrigerator
- Keeps for up to 2 weeks in a sealed container.
- Let it come to room temperature before serving.
Freezer
- Wrap individual pieces in wax paper and place in a freezer-safe container.
- Freeze for up to 3 months.
- Thaw at room temperature before eating.
10. Nutrition Information (Per 1 square, ~36 pieces)
| Nutrient | Amount |
|---|---|
| Calories | 110 |
| Total Fat | 4.5g |
| Saturated Fat | 2.8g |
| Carbohydrates | 18g |
| Sugar | 17g |
| Protein | 0.2g |
| Cholesterol | 12mg |
| Sodium | 20mg |
Note: Nutrition will vary based on ingredients used and portion sizes.
11. Frequently Asked Questions
Q1: Can I make vanilla fudge without a candy thermometer?
Yes! This recipe is specifically designed to be thermometer-free. Just follow the boiling time carefully.
Q2: Can I double the recipe?
Absolutely. Use a 9×13-inch pan and increase the cooking time by 2–3 minutes.
Q3: Is it gluten-free?
Yes—if all your ingredients are certified gluten-free, especially vanilla extract and powdered sugar.
Q4: Can I use plant-based milk or butter?
Yes, vegan substitutes can be used, although the texture might vary slightly.
Q5: What if I want a softer fudge?
Reduce the powdered sugar slightly or store it at a warmer temperature.
Q6: Can I add toppings or mix-ins?
sprinkles Of course! Try sprinkles, crushed cookies, or even dried fruit for fun textures.
12. Final Thoughts: A Treat Worth Mastering
Classic Vanilla Fudge is more than just a dessert—it’s a memory in the making. Its rich, creamy texture and warm vanilla essence are a gentle reminder that some of life’s sweetest joys come from the simplest things.
Whether you’re crafting homemade holiday gifts, preparing for a bake sale, or just treating yourself on a quiet afternoon, this recipe will never disappoint. And with the many variations and tips above, it can become your own family tradition.
So grab your saucepan, your sugar, and your love of all things sweet—and bring the classic vanilla fudge back to your kitchen.