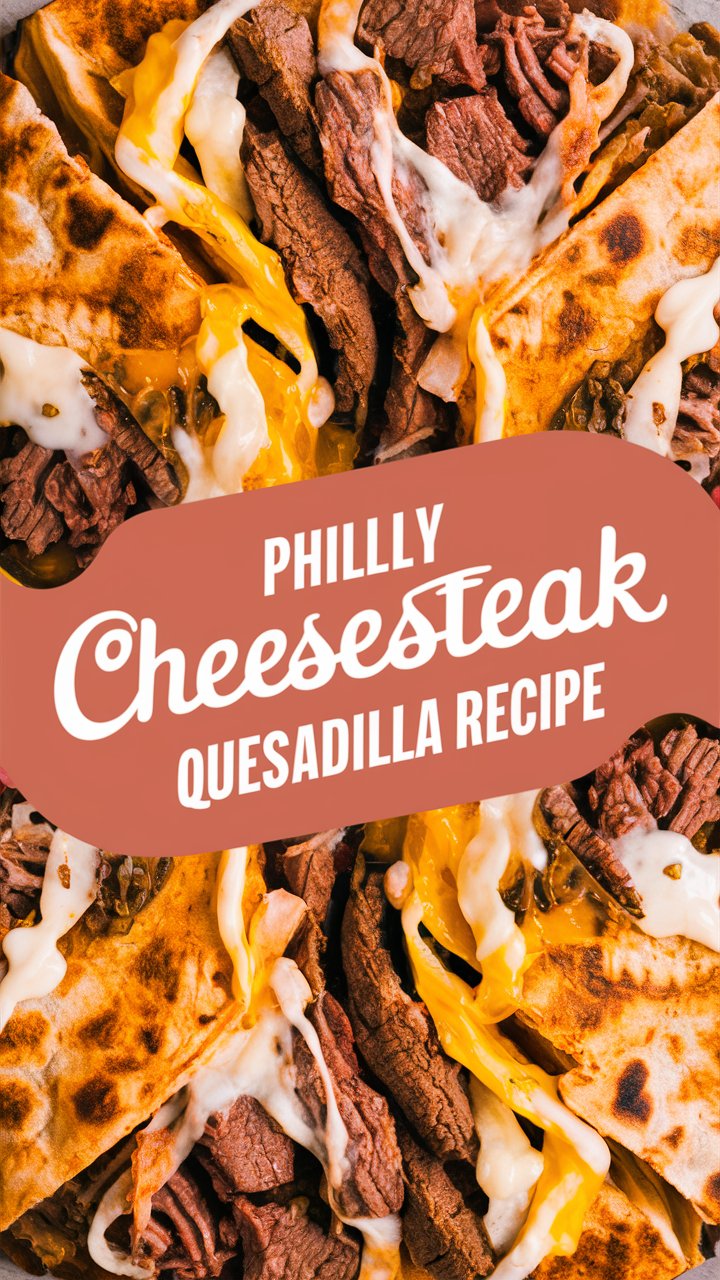
How to Make the Perfect Philly Cheesesteak Quesadilla at Home 2025
When two beloved classics—Philly cheesesteak and quesadilla—come together, the result is pure magic. A Philly Cheesesteak Quesadilla delivers the best of both worlds: the savory, juicy steak and sautéed vegetables from a cheesesteak, wrapped in a crisp tortilla filled with melty cheese.
In under 30 minutes, you can enjoy a comfort food mashup that’s perfect for lunch, dinner, game days, or casual gatherings. This article gives you a complete, professional, well-structured recipe plus tips, variations, serving ideas, and SEO-friendly guidance so it reads well both for users and search engines.
1. Why You’ll Love This Recipe
- Flavor fusion at its finest — It captures all the signature flavors of a classic Philly cheesesteak (steak, onions, peppers, mushrooms, melted cheese) in a more portable form.
- Crunch outside, oozy cheese inside — The contrast of a golden, crisp tortilla with gooey cheese and juicy filling gives great texture.
- Quick & efficient — You can have it on the table in about 25–30 minutes, making it ideal for weeknights or impromptu cravings.
- Customizable & crowd-pleasing — You can modify spice levels, go vegetarian, or swap cheeses to match preferences.
- Minimal cleanup — Most of the cooking happens in just one or two pans; assembly is straightforward.
This is the kind of recipe people will bookmark and make again and again.
2. Ingredient List (with quantities)
Here’s a clean, easy-to-follow list:
| Component | Ingredient | Quantity / Notes |
|---|---|---|
| Protein & Base | Thinly sliced beef (ribeye, sirloin, or top round) | ~ ½ pound (225–250 g) |
| Salt | ¼ teaspoon | |
| Black pepper | ⅛ teaspoon | |
| Vegetables | Onion (medium) | ½, thinly sliced |
| Red bell pepper | ½, thinly sliced | |
| Green bell pepper | ½, thinly sliced | |
| Mushrooms | 6 oz (~170 g), sliced | |
| Garlic | 1 clove, minced | |
| Olive oil (or other neutral oil) | 2–3 teaspoons | |
| Cheese & Melt | Provolone cheese slices | ~1½–2 slices per quesadilla (or equivalent shredded) |
| (Optional) Mayonnaise | A thin spread, ~1 teaspoon per tortilla side | |
| Tortillas & Assembly | Flour tortillas (medium or burrito size) | 2 (or more, depending on how many quesadillas you want) |
| Optional Seasoning / Flavor Boosters | Hot sauce or jalapeño slices | To taste |
| Steak sauce or Worcestershire | A drizzle (optional) | |
| Butter or extra oil | For cooking the quesadilla edges (optional) |
Yield: This batch should make 2 large quesadillas (serving 2–3 people, depending on appetite). You can double or triple for more servings.
3. Step-by-Step Instructions
Below is an organized, clear method to get perfect results.
Step 1: Prepare the Beef
- Heat 2 teaspoons of olive oil in a large skillet over medium-high heat.
- Season your thinly sliced beef with ¼ teaspoon salt and ⅛ teaspoon black pepper.
- Add the beef to the skillet in a single layer (don’t overcrowd). Cook 2–3 minutes until nicely browned, stirring or flipping halfway.
- Once cooked through, remove the beef from the skillet and cover it (foil or plate) to keep warm.
Step 2: Sauté the Vegetables
- In the same skillet, add a touch more oil if needed (about ½ teaspoon).
- Add sliced onion, red pepper, green pepper, and mushrooms.
- Cook 6–8 minutes, stirring occasionally, until vegetables are soft and beginning to caramelize.
- Add the minced garlic and cook for 1 more minute to release its fragrance.
- Return the beef to the pan, mixing it with the vegetables. Optionally, drizzle a bit of steak sauce or Worcestershire for extra flavor. Remove from heat.
Step 3: Assemble the Quesadillas
- (Optional) Spread a thin layer of mayonnaise on the inner surfaces of the tortillas—this adds moisture and richness.
- On one half of a tortilla, spoon about half of the beef-and-veg mixture.
- Layer 1½–2 slices (or equivalent shredded) of provolone cheese on top.
- Fold the tortilla over to make a semicircle (or fold both sides in, if you prefer a pocket style).
Step 4: Toast & Melt
- Heat a clean skillet (or griddle) over medium heat.
- Add a small amount of butter or oil around the edges for extra crispiness (optional).
- Place the folded quesadilla in the skillet. Press gently with a spatula or another skillet to help it bind.
- Cook 2–3 minutes per side, or until the tortilla is golden brown and the cheese is fully melted. Adjust heat if needed to avoid burning.
- Repeat for the second quesadilla.
Step 5: Serve
- Remove from heat and let rest for 30 seconds (prevents molten cheese from oozing immediately).
- Slice into wedges (typically 3 or 4 per quesadilla).
- Serve hot with dipping sauces or sides (see below).
4. Pro Tips & Technique Guidance
Here are advanced pointers that help elevate this recipe:
- Use thin-sliced steak: The thinner the cut, the quicker it cooks and the more tender the bites.
- Pat the meat dry before seasoning — this helps browning.
- Don’t overcrowd your skillet — if the pan is too full, the meat steams instead of sears. Work in batches if necessary.
- Moderate your heat — medium-high for initial searing, then lower to medium for quesadilla toasting to avoid burning the tortilla while cheese melts.
- Press while toasting — using a spatula (or another skillet) gently helps the tortilla cling and ensures even melt.
- Edge sealing — if you find the edges peeling, add a thin dab of water or butter to help smooth binding.
- Cheese placement matters — place one layer directly on the tortilla, then the filling, then another layer of cheese before folding. The cheese on both sides helps “glue” it shut.
- Check doneness by color, not time — tortillas vary. Golden brown is your target, not exactly “2 minutes.”
- Rest briefly after cooking — gives the filling a moment to settle and cool.
5. Serving Suggestions & Side Pairings
A great quesadilla deserves thoughtful pairings. Here are ideas:
- Dipping Sauces: garlic aioli, spicy mayonnaise, chipotle sauce, salsa verde, or even classic ketchup.
- Crispy Sides: shoestring fries, wedge potatoes, or seasoned potato chips.
- Pickled & Acidic Elements: slices of dill pickle, pickled jalapeños, coleslaw, or a crisp cucumber salad to cut richness.
- Soups: tomato soup or creamy roasted red pepper soup make cozy companions.
- Fresh Salad: a simple green salad with vinaigrette adds brightness and balance.
- Mexican Touch: serve with guacamole or a small side of pico de gallo for a fusion twist.
Serve immediately while hot and crispy—though leftovers (reheated) can also satisfy.
6. Variations & Substitutions
You can adapt this recipe to preferences, dietary needs, or ingredient availability:
6.1 Meat Swaps
- Ground beef: Brown it, drain excess fat, then mix into sautéed veggies.
- Chicken or turkey: Use cooked, shredded or thinly sliced. Add some mild seasoning.
- Pork tenderloin or thin pork strips: Works well too.
6.2 Vegetarian / Vegan Version
- Omit meat entirely. Increase vegetables (mushrooms, zucchini, spinach) or use meat alternatives (e.g., plant-based beef strips).
- Use vegan cheese that melts well.
- Add beans or lentils for protein.
6.3 Cheese Options
- Mozzarella, Monterey Jack, or a mild cheddar are good alternatives.
- For extra flavor: use a mix (e.g. provolone + mozzarella).
- Avoid overly aged cheeses—they tend to be dry and don’t melt as smoothly.
6.4 Flavor Enhancers
- Add jalapeños or sliced chilies for heat.
- Incorporate hot sauce or chili flakes to the filling.
- Add herbs like oregano, thyme, or parsley toward the end.
- A light drizzle of steak sauce or Worcestershire during step 2 adds depth.
6.5 Low-Carb / Gluten-Free Adaptation
- Use low-carb or gluten-free tortillas (check that they crisp well).
- Or use lettuce wraps—though you lose the crisp tortilla shell.
6.6 Double-Fold / Pocket Style
- Rather than simply folding in half, you can fold both sides toward the center to form a “pocket” style. This can help trap the filling better.
7. Make-Ahead, Storage & Reheating
Make-Ahead Tips
- You can prepare the filling (meat + vegetables) ahead and refrigerate up to 2 days.
- When ready to eat, reheat filler slightly, assemble, and toast the quesadilla fresh.
Storage
- Refrigerate: Store cooked quesadillas in an airtight container for up to 3 days.
- Freeze: If storing raw (un-toasted) quesadillas, wrap each tightly in foil or plastic wrap, then freeze for up to 1 month.
Reheating
- Skillet or griddle: Best—add a bit of butter or oil, reheat on medium, pressing gently until crisp and warmed through.
- Oven/toaster oven: Preheat to ~ 350 °F (~175 °C); bake 8–10 minutes until warm and crisp.
- Air fryer: 3–5 minutes at ~ 350 °F or until heated through.
Avoid microwaving, as that tends to get the tortilla soggy.
8. Nutritional Info & Portioning
(The following is an approximate estimate per quesadilla – values can vary depending on brands, portion sizes, and substitutions.)
| Nutrient | Approximate Amount |
|---|---|
| Calories | ~ 550–650 kcal |
| Protein | ~ 35–40 g |
| Total Fat | ~ 30–35 g |
| Saturated Fat | ~ 12–15 g |
| Carbohydrates | ~ 35–45 g |
| Dietary Fiber | ~ 3–5 g |
| Sodium | depends on seasoning & cheese (could be ~ 900–1,200 mg) |
If you reduce cheese or use leaner meat, those numbers will drop. For more precise results, plug your exact ingredients into a nutrition calculator.
9. Frequently Asked Questions (FAQ)
Q. Can I use ground beef instead of sliced steak?
Yes. Brown the ground beef first, drain excess fat, then add it to your sautéed vegetables and proceed as usual.
Q. What type of cheese melts best?
Provolone is ideal because it melts smoothly without becoming too oily. Mozzarella and Monterey Jack are also good options.
Q. Will the tortilla get soft or soggy?
If cooked properly on medium heat and pressed gently, the tortilla should crisp. Avoid steaming by keeping the pan uncovered and not overstuffing.
Q. How do I prevent filling from falling out when flipping?
Avoid overfilling. Use cheese on both top and bottom so it helps seal. Press lightly during cooking so the tortilla adheres.
Q. Can I make this spicy?
Absolutely! Add jalapeño slices, hot sauce, or chili flakes to the meat or on top of the cheese before folding.
Q. Is it okay to assemble and toast later?
You can assemble and store as raw quesadillas in the freezer, but always toast fresh for the best crispiness.
Q. Can this be vegetarian?
Yes—simply omit the beef and use extra vegetables, mushrooms, or a plant-based substitute. Use a good melting cheese (or vegan cheese).
11. Final Thoughts
This Philly Cheesesteak Quesadilla is a satisfying fusion of two favorites, delivering all the savory flavor of a cheesesteak in a convenient, crispy, cheesy package.
- With just a few quality ingredients and 30 minutes, you get restaurant-style results
- You have flexibility—meat, vegetarian, spicy, low-carb, you name it
- It’s a crowd-pleaser and a recipe worth repeating