How to Bake Perfect Condensed Milk Snow Cookies: Step-by-Step Recipe 2025
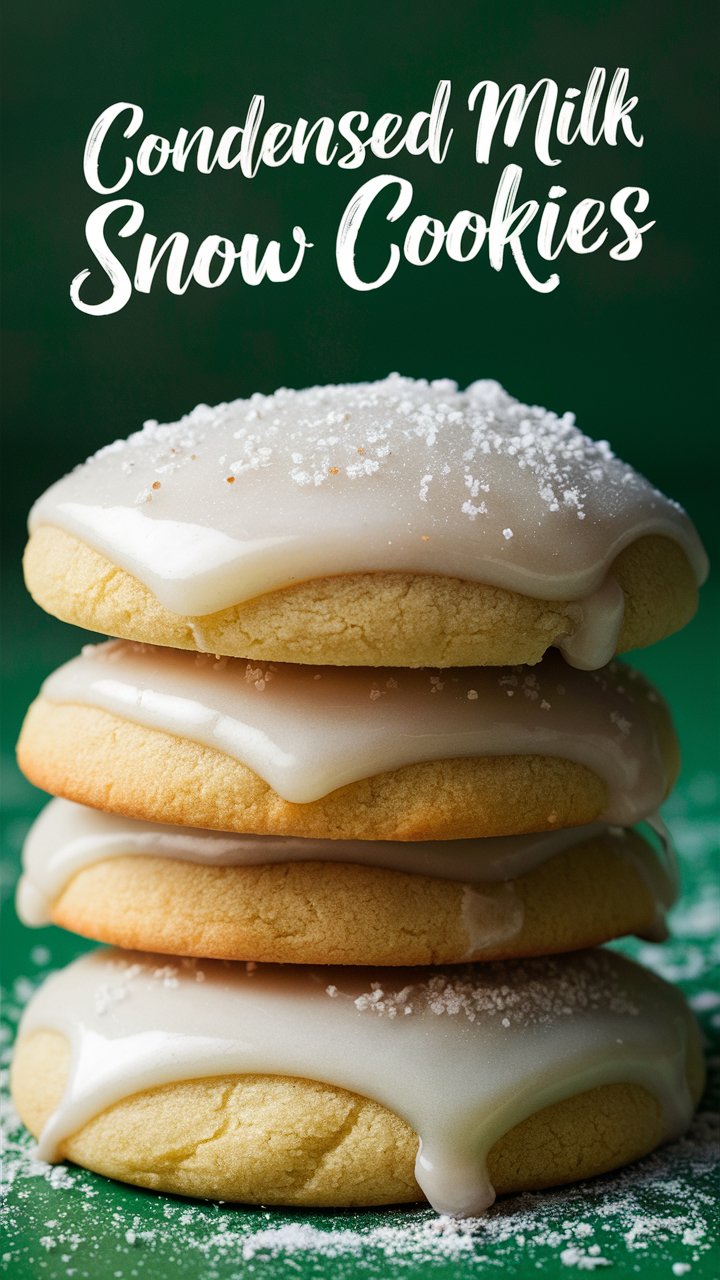
When winter arrives, and the festive season fills our hearts with joy, the craving for warm, comforting treats increases. Among the plethora of holiday sweets, Condensed Milk Snow Cookies stand out for their unique melt-in-the-mouth texture, subtle sweetness, and charming snowy appearance. These delicate cookies are dusted generously with powdered sugar, creating the illusion of freshly fallen snow—a perfect addition to your dessert table or cozy tea time.
Soft, buttery, and lightly flavored with vanilla, these cookies combine simple ingredients with a rich taste, making them a favorite across generations and cultures. Whether you’re an experienced baker or a novice, this recipe is easy to follow and guarantees delightful results every time.
In this comprehensive guide, you’ll learn everything about making perfect Condensed Milk Snow Cookies, including the history, ingredient insights, expert tips, variations, and answers to all your baking questions.
History and Origin of Snow Cookies
Snow cookies have roots that trace back to European holiday traditions, especially around Christmas. Variants of these cookies have been enjoyed in different cultures, often associated with winter celebrations where powdered sugar mimics the snow-covered landscapes. The use of sweetened condensed milk as a key ingredient, however, is a more modern innovation that adds moisture, sweetness, and a creamy texture to the cookies, differentiating them from traditional butter cookies or shortbreads.
The marriage of condensed milk with classic buttery dough elevates the cookie’s softness and richness, making them distinctively tender. These cookies became particularly popular in countries where condensed milk is a pantry staple, such as parts of Asia, Latin America, and the Middle East, blending tradition with local flavors.
Ingredients Explained: Why Each One Matters
1. Unsalted Butter
Butter is the backbone of these cookies, providing richness and flavor. Using unsalted butter gives you control over the saltiness and ensures a clean, creamy taste. The butter must be softened but not melted for proper creaming with other ingredients.
2. Sweetened Condensed Milk
This thick, sweet milk adds moisture and a subtle caramel-like flavor. It acts as a natural sweetener and binder, contributing to the cookie’s soft, melt-in-the-mouth texture.
3. All-Purpose Flour
Flour provides the structure. Using all-purpose flour with a moderate protein content ensures the cookies are tender yet hold their shape well. For gluten-free options, a blend of rice flour, tapioca starch, and xanthan gum works well.
4. Powdered Sugar
Powdered sugar (also known as icing sugar) is used inside the dough and generously dusted on the baked cookies, giving the snowy effect. It dissolves smoothly, enhancing sweetness without graininess.
5. Vanilla Extract
Vanilla adds a warm, aromatic depth to the cookies, balancing the sweetness and butteriness perfectly.
6. Salt
A pinch of salt enhances all other flavors, balancing sweetness and rounding out the taste.
Step-by-Step Recipe with Expert Tips
Preparing the Dough
- Cream the Butter: In a large bowl, beat 1 cup of softened unsalted butter with a hand mixer or stand mixer on medium speed until smooth and creamy (about 2-3 minutes). Don’t overbeat—just enough to lighten the butter.
- Add Condensed Milk and Vanilla: Pour in ½ cup sweetened condensed milk and 1 teaspoon vanilla extract. Mix on low speed until fully incorporated.
- Combine Dry Ingredients: Sift together 2 cups all-purpose flour, ½ cup powdered sugar, and ¼ teaspoon salt. Gradually add this dry mix to the wet ingredients, folding gently with a spatula or mixing slowly with the mixer until a soft, pliable dough forms.
Pro Tip: Avoid overmixing to maintain the tender crumb of the cookies.
Shaping the Cookies
- Preheat your oven to 325°F (163°C) and line a baking tray with parchment paper.
- Roll the dough into 1-inch balls. To create the classic snow cookie shape, gently flatten each ball with your fingertips or press slightly with a fork for a simple decorative pattern.
Alternative Shape: Use a small cookie scoop to ensure uniform size.
Baking to Perfection
- Place the cookies on the baking sheet, leaving about 2 inches between each.
- Bake for 12-15 minutes or until the edges start turning very light golden but the cookies remain pale.
Important: The cookies should not brown too much, or they will lose their soft, melt-in-mouth quality.
Coating with Powdered Sugar
- Let the cookies cool on the baking sheet for 5 minutes. While still warm, generously dust them with powdered sugar.
- Once completely cooled, roll or dust the cookies again in powdered sugar for an extra “snowy” effect.
Common Mistakes & How to Avoid Them
- Cookies Too Dry or Crumbly: Often caused by too much flour or overbaking. Always measure flour accurately using the spoon-and-level method. Bake just until edges are light golden.
- Cookies Spread Too Much: Butter that is too warm can cause spreading. Keep butter softened but cool. Chilling dough for 15-30 minutes before baking helps maintain shape.
- Powdered Sugar Not Sticking Well: Dust cookies while still warm. Rolling them in sugar again after cooling ensures a thick coating.
Nutritional Information (Per Cookie Approximate)
- Calories: 120
- Fat: 7g (Saturated Fat: 4.5g)
- Carbohydrates: 14g (Sugars: 6g)
- Protein: 1.5g
- Fiber: 0.3g
- Sodium: 30mg
Note: Values may vary depending on brands and ingredient substitutions.
Flavor Variations and Enhancements
- Citrus Zest: Add finely grated lemon or orange zest to the dough for a refreshing aroma.
- Nuts: Fold in chopped pistachios, almonds, or walnuts for crunch.
- Extracts: Substitute or combine vanilla with almond, coconut, or lemon extract.
- Spices: A pinch of cinnamon or cardamom adds warmth.
- Chocolate: Dip cooled cookies halfway into melted white or dark chocolate for an elegant touch.
- Gluten-Free Version: Use a gluten-free flour blend with xanthan gum to mimic texture.
- Vegan Option: Replace butter with vegan margarine and use a plant-based condensed milk substitute.
Storage and Shelf Life
- Room Temperature: Store cookies in an airtight container at room temperature for up to 1 week. Keep in a cool, dry place.
- Refrigeration: Refrigerate for up to 2 weeks; allow cookies to come to room temperature before serving.
- Freezing: Freeze baked cookies in a sealed container or freezer bag for up to 3 months. Thaw overnight at room temperature, then dust with fresh powdered sugar if needed.
Serving Suggestions and Pairings
Condensed Milk Snow Cookies pair beautifully with:
- Hot beverages like cocoa, coffee, or chai tea.
- Vanilla ice cream or whipped cream for an indulgent dessert.
- Festive platters alongside gingerbread, peppermint bark, or fruitcake.
Present them on a decorative plate with fresh berries or edible flowers for a sophisticated touch.
Frequently Asked Questions (FAQs)
Can I substitute margarine for butter?
Yes, but butter gives the best flavor and texture. Margarine can alter taste and may produce slightly less tender cookies.
How do I keep the cookies soft longer?
Store airtight at room temperature and avoid overbaking. Adding condensed milk helps retain moisture.
Can I make the dough ahead?
Yes, refrigerate the dough for up to 24 hours. Let it soften slightly before shaping.
How do I make these cookies gluten-free?
Use a gluten-free all-purpose flour blend with xanthan gum added for structure.
Can I add other flavors?
Absolutely! Try citrus zest, nuts, or different extracts for a personalized twist.
Conclusion
Condensed Milk Snow Cookies are a timeless, comforting treat that brings a touch of snowy magic to your kitchen. With simple ingredients and easy preparation, they are perfect for beginners and seasoned bakers alike. Whether enjoyed with a warm cup of tea or gifted to loved ones, these cookies will surely become a seasonal favorite.
Try this recipe today, experiment with flavors, and share your snowy creations with friends and family. Happy baking!