Homemade Chocolate Truffles Recipe — Luxurious and Simple to Make 2025
Few desserts embody indulgence quite like chocolate truffles. With their rich, velvety centers and delicate outer coatings, these bite-sized treats are the perfect way to express love, celebrate special occasions, or simply satisfy a craving for something sweet and luxurious. Whether you’re a novice in the kitchen or a seasoned chocolatier, making homemade chocolate truffles is surprisingly easy and deeply rewarding.
This article is your definitive guide to creating the most luscious chocolate truffles at home — from choosing the finest ingredients to mastering the perfect texture, exploring flavor variations, and presenting your creations beautifully. No matter the occasion — Valentine’s Day, birthdays, holidays, or a simple midweek treat — these truffles will elevate your dessert game to new heights.
What Are Chocolate Truffles?
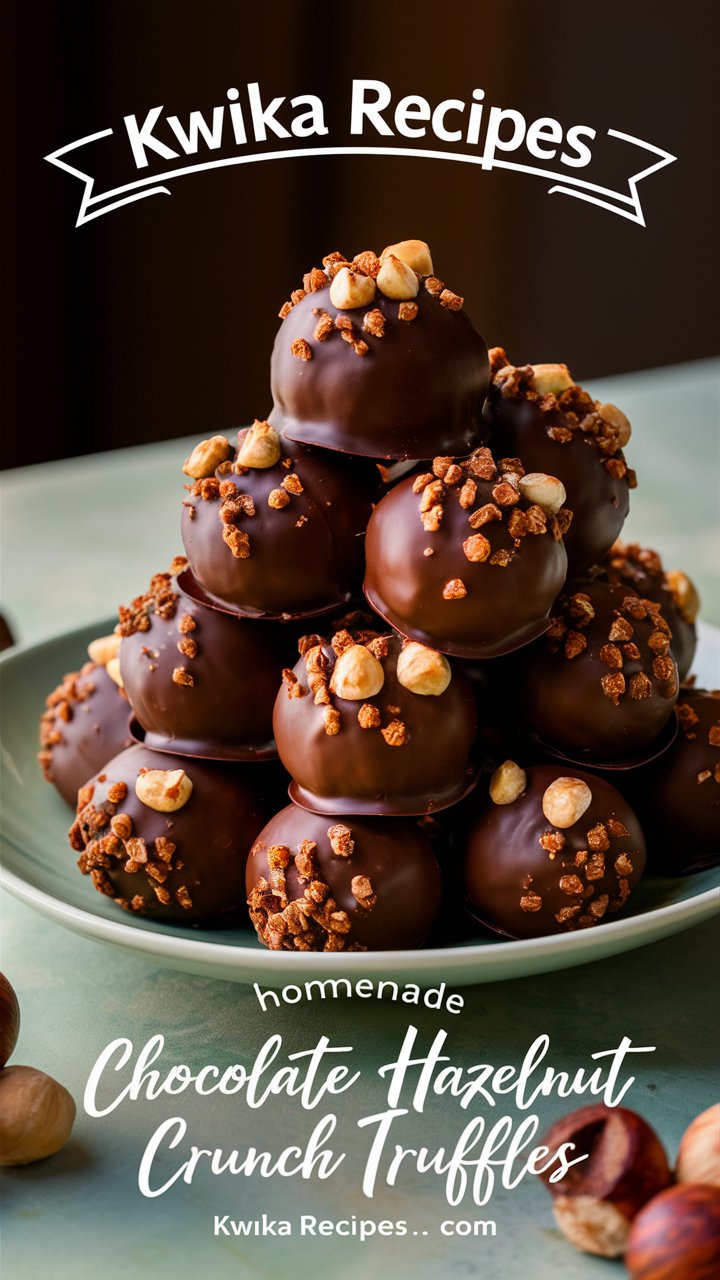
Chocolate truffles are small confections traditionally made with a ganache center—an emulsion of chocolate and cream—rolled into balls and coated in cocoa powder or other toppings. The name comes from their resemblance to the rare and expensive truffle fungus, prized in gourmet cooking.
Over time, truffles have evolved beyond the classic chocolate-and-cream base. Modern recipes include various coatings such as nuts, coconut flakes, sprinkles, and even freeze-dried fruit powders, allowing for creative twists on this timeless sweet.
Ingredients: Choosing the Best Chocolate and More
The success of chocolate truffles hinges largely on the quality of the ingredients you use. Here’s a detailed breakdown:
- Chocolate: Opt for high-quality dark chocolate with 60–70% cocoa content. This balance offers intense flavor without excessive bitterness. Avoid baking chocolate or chocolate chips designed for cookies, as stabilizers can affect texture and melt.
- Heavy Cream: Use fresh, full-fat heavy cream. It creates the smooth ganache base that melts perfectly on the tongue.
- Butter (Optional): Some recipes add a tablespoon of unsalted butter to enrich the ganache, giving it a silky finish.
- Flavor Enhancers: Vanilla extract adds warmth, but you can experiment with almond extract, coffee, or liqueurs like Grand Marnier or rum.
- Coatings: Classic unsweetened cocoa powder is a staple, but shredded coconut, chopped nuts (almonds, hazelnuts, pistachios), sprinkles, or crushed freeze-dried berries offer exciting alternatives.
Equipment You’ll Need
While chocolate truffles don’t require specialized tools, having the right equipment simplifies the process:
- Heatproof mixing bowl
- Small saucepan
- Whisk or spatula
- Cookie scoop or teaspoon for portioning
- Baking sheet lined with parchment paper
- Bowls for coating toppings
- Refrigerator or freezer for chilling
Step-by-Step Guide to Making Perfect Chocolate Truffles
Step 1: Preparing the Ganache
Begin by finely chopping your high-quality dark chocolate into small pieces to ensure even melting. Place the chopped chocolate in a heatproof bowl.
Next, heat your heavy cream in a small saucepan over medium heat until it just starts to simmer. Avoid boiling, as overheated cream can scorch and alter the flavor.
Pour the hot cream over the chopped chocolate and let it sit undisturbed for 2–3 minutes. This rest allows the chocolate to soften and begin melting.
Using a spatula or whisk, gently stir the mixture until smooth and glossy. At this stage, you may add a teaspoon of vanilla extract or a splash of your chosen liqueur for added depth of flavor. For an extra touch of richness, consider folding in a tablespoon of unsalted butter.
Step 2: Chilling the Ganache
Cover the bowl with plastic wrap and refrigerate for 1 to 2 hours. The ganache should become firm yet pliable enough to scoop. Avoid chilling too long, which can make it too hard to work with.
If you’re short on time, you can chill in the freezer, checking every 15 minutes to prevent freezing solid.
Step 3: Scooping and Rolling
Once chilled, use a small cookie scoop or teaspoon to portion the ganache. Roll each portion quickly between your palms to form smooth balls.
To prevent melting from the warmth of your hands, work swiftly and consider chilling your hands in cold water or wearing food-safe gloves.
Step 4: Coating the Truffles
Prepare your coating bowls with cocoa powder, shredded coconut, nuts, or sprinkles.
Roll each truffle in your desired coating, pressing gently to ensure it sticks. For powdered coatings, tap off excess for a neat finish.
Arrange the coated truffles on a parchment-lined tray.
Creative Coating Ideas and Flavor Variations
Don’t limit yourself to classic cocoa powder. Here are some inspired ideas to customize your truffles:
- Espresso Dust: Mix finely ground espresso with cocoa powder for a mocha twist.
- Chili or Cinnamon: Add a pinch of chili powder or cinnamon to cocoa powder for a spicy kick.
- Matcha Green Tea: Roll truffles in matcha powder for an earthy, vibrant flavor.
- White Chocolate Drizzle: Melt white chocolate and drizzle over dark truffles for contrast.
- Fruit Infusions: Add freeze-dried raspberry powder to the coating for tartness and color.
- Nutty Crunch: Roll in finely chopped toasted pistachios, almonds, or hazelnuts for texture.
Tips for Perfect Texture and Flavor Every Time
- Use freshly chopped chocolate rather than chips to ensure smooth melting.
- Avoid overheating cream to preserve flavor and prevent graininess.
- Stir ganache gently to maintain a glossy finish.
- Keep hands cool during rolling to avoid melting.
- Chill rolled truffles before coating if they soften too much.
- Experiment with flavor additions but keep the base simple.
How to Store Chocolate Truffles to Maintain Freshness
Store truffles in an airtight container in the refrigerator for up to two weeks. Before serving, let them sit at room temperature for 15–20 minutes to bring out their creamy texture.
For longer storage, freeze truffles for up to three months. Thaw overnight in the fridge before serving.
Troubleshooting Common Problems in Truffle Making
- Ganache too runny: Chill longer or add more chopped chocolate while still warm.
- Grainy ganache: Use good quality chocolate and avoid overheating cream.
- Truffles melting during rolling: Work quickly and keep hands cold.
- Coating doesn’t stick: Roll truffles immediately after chilling while slightly tacky.
Healthier and Dietary-Friendly Chocolate Truffle Alternatives
- Use coconut cream instead of dairy cream for a vegan and lactose-free version.
- Substitute sugar-free or low-sugar chocolate to reduce sugar content.
- Add natural sweeteners like maple syrup or agave to the ganache.
- Use dark chocolate with higher cocoa content (70%+) for more antioxidants.
Gift-Wrapping and Presentation Ideas for Homemade Truffles
Present your truffles in mini paper cups inside decorative boxes or tins for gifting.
Add a handwritten note or label with flavor descriptions.
Consider layering truffles with parchment paper for an elegant touch.
Frequently Asked Questions (FAQs)
Q: Can I use milk or white chocolate?
A: Yes, but adjust cream amount as these chocolates contain more fat and sugar.
Q: How do I add flavors like coffee or liqueur?
A: Stir in 1–2 tablespoons of espresso or liqueur with the cream before mixing.
Q: Can I freeze truffles?
A: Yes, store airtight and thaw in fridge overnight.
Q: What coating sticks best?
A: Cocoa powder, coconut flakes, and sprinkles work very well.
Final Thoughts
Mastering homemade chocolate truffles is easier than you think and incredibly satisfying. With a handful of quality ingredients, a bit of patience, and a dash of creativity, you can craft exquisite treats that rival any chocolatier’s.
Why settle for store-bought when you can delight your family and friends with personalized, handcrafted truffles? Give this recipe a try and unlock a world of chocolatey indulgence.
Nutritional Information (Approximate per truffle, 24 servings):
- Calories: 90
- Fat: 7g
- Saturated Fat: 4g
- Carbohydrates: 6g
- Sugar: 4g
- Fiber: 1g
- Protein: 1g
- Sodium: 5mg


